Ghost is a great blogging platform. It's minimalist, fast and looks professional.
But it is still lacking in a number of ways. One such way, is that it lacks a subscribe form editor or template. So let's make our own!
So here is the feature list that I want to implement for this subscribe form:
Super Cool Feature List
- Snippet Enabled
- Static Background Image + Override image on specific subscribe forms
- Change all Subscribe form elements from a central location
Snippet Enabled
Ghost has a snippet system, whereby you can write some text, or even a HTML block and turn it into a snippet. This creates a sort of "blueprint", where you can find the relevant snippet via a drop-down box while creating a blog and simply insert the snippet.
However one pretty severe flaw with this system is that you cannot go back and change the base snippet to alter all the snippets you have essentially pasted. This sucks when you have to go back over 40 blog posts to change the text in a subscribe box (trust me I've done it!). A solution will be outlined in a further step!
Static Background Image Selection
As with all cool features, it would be nice to have the ability to revert without too much hassle. This feature would let the admin change a setting somewhere to let the newsletter know that we want a specific background instead of the default one.
Change all Subscribe form elements
As mentioned previously, we want to use the Ghost snippet tooling, but we also want to be able to change all the specified elements in the snippet from a central location. The elements we would like to change are:
- Title
- Description
- Background Image
Time To Code
So where do we start?
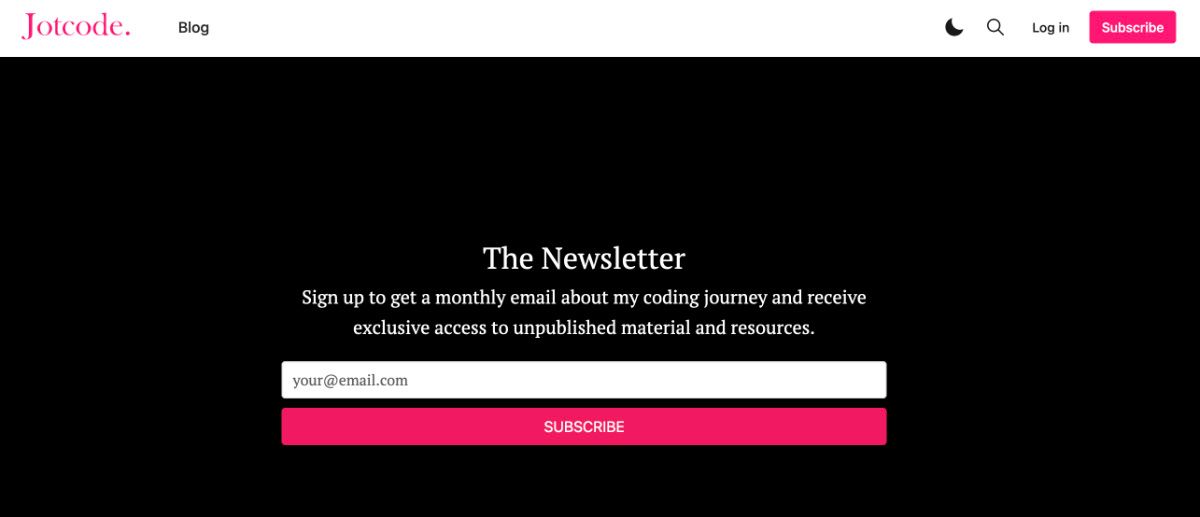
The first we should do is create our basic form structure, we are going to start with our main div:
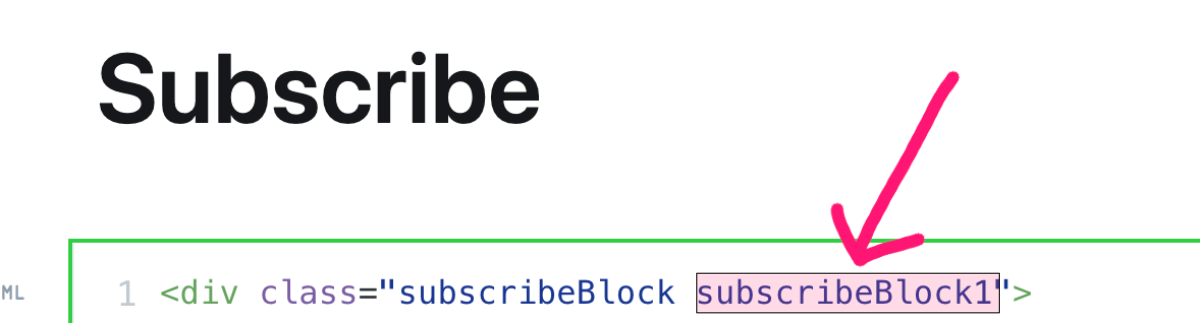
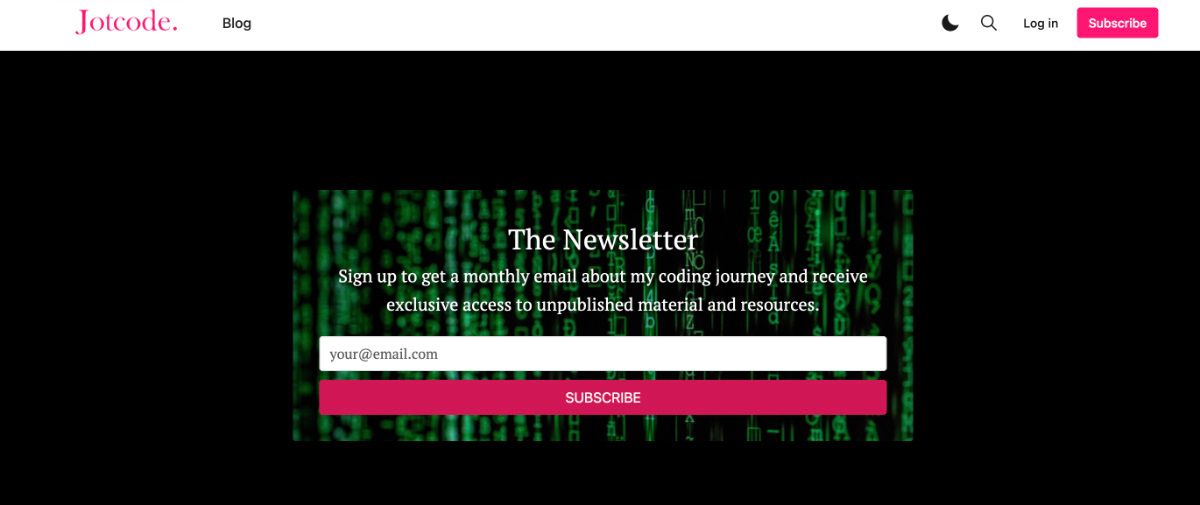
<div class="subscribeBlock">

</div>Now we can add the title element:
<div class="subscribeBlock">
    <p class="toBeReplacedSubscribeBlock1Title">
    	<span>The Newsletter<span>
    </p>
</div>Now let's add the description element:
<div class="subscribeBlock">
    <p class="toBeReplacedSubscribeBlock1Title">
    	<span>The Newsletter<span>
    </p>
    <p class="toBeReplacedSubscribeBlock1Description">
    	<span>Sign up to get a monthly email about my coding journey and receive exclusive access to unpublished material and resources.
        </span>
    </p>
</div>Once we have that we can add the main form element:
<div class="subscribeBlock">
    <p class="toBeReplacedSubscribeBlock1Title">
    	<span>The Newsletter<span>
    </p>
    <p class="toBeReplacedSubscribeBlock1Description">
    	<span>Sign up to get a monthly email about my coding journey and receive exclusive access to unpublished material and resources.
        </span>
    </p>
    <form class="f-form subscribeBlock1Form" data-members-form="subscribe">
        <div class="subscribe-form-fields">
            <input class="tc" data-members-email="" placeholder="your@email.com" autocomplete="false" required>
            <button type="submit" class="button button--success u-sizeFullWidth subscribeBlock1Button">
                <span>SUBSCRIBE</span>
            </button>

        </div>
        <div class="message-success  u-marginTop10 u-hide text-success"><strong>Great!</strong> Check your inbox and click the link to confirm your subscription</div>
        <div class="message-error u-marginTop10 u-hide"><span>Please enter a valid email address!</span></div>
  </form>
</div>Now we finally have to add the style for the response messages:
<div class="subscribeBlock subscribeBlock2">
    <p class="toBeReplacedSubscribeBlock2Title">
    	<span>The Newsletter<span>
    </p>
    <p class="toBeReplacedSubscribeBlock2Description">
    	<span>Sign up to get a monthly email about my coding journey and receive exclusive access to unpublished material and resources.
        </span>
    </p>
    <form class="f-form subscribeBlock2Form" data-members-form="subscribe">
        <div class="subscribe-form-fields">
            <input class="tc" data-members-email="" placeholder="your@email.com" autocomplete="false" required>
            <button type="submit" class="button button--success u-sizeFullWidth subscribeBlock2Button">
                <span>SUBSCRIBE</span>
            </button>

        </div>
        <div class="message-success  u-marginTop10 u-hide text-success"><strong>Great!</strong> Check your inbox and click the link to confirm your subscription</div>
        <div class="message-error u-marginTop10 u-hide"><span>Please enter a valid email address!</span></div>
  </form>
</div>
<style>
    .f-form.success .message-success {display:block}
    .f-form.success .subscribe-form-fields {display:none}
    .f-form.error .message-error {display:block}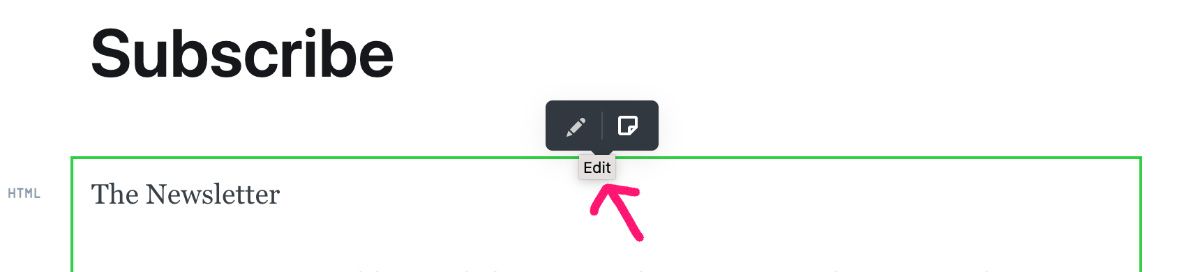
</style>So now on Ghost we can create a blog or a post to place this code in a HTML block:
Then we can create a snippet of it and called it 'subscribe-block':
Now we will create the styling code.
/* Subscribe Block Core */
.subscribeBlock {
padding: 30px;
border-radius: 3px;
text-align:center;
}
/* Subscribe Block Core End */
/* Subscribe Block 1 */
.toBeReplacedSubscribeBlock1Title span {
display: none;
}
.toBeReplacedSubscribeBlock1Title:after {
font-size: 2rem;
color: white;
content: "The Newsletter";
margin:0 0 20px;
text-shadow: 3px 3px 3px black;
}
.toBeReplacedSubscribeBlock1Description span {
display: none;
}
.toBeReplacedSubscribeBlock1Description:after {
color: white;
text-shadow: 3px 3px 3px black;
content: "Sign up to get a monthly email about my coding journey and receive exclusive access to unpublished material and resources.";
}
.subscribeBlock1Button span {
display: none;
margin-top:10px;
}
.subscribeBlock1Button:after {
color: white;
content: "SUBSCRIBE"
}
.subscribeBlock1Button:hover {
background: red;
border-color: red;
}
.subscribeBlock1Button {
color: #fff;
background: #D11755;
border-color: #D11755;
}
.subscribeBlock1Button:hover {
background: #F11860;
border-color: #F11860;
}
.subscribeBlock1Form {
margin:20px 0 0;
}
.subscribeBlock1 {
background-color: black;
background-image:url('image-url.jpg');
}
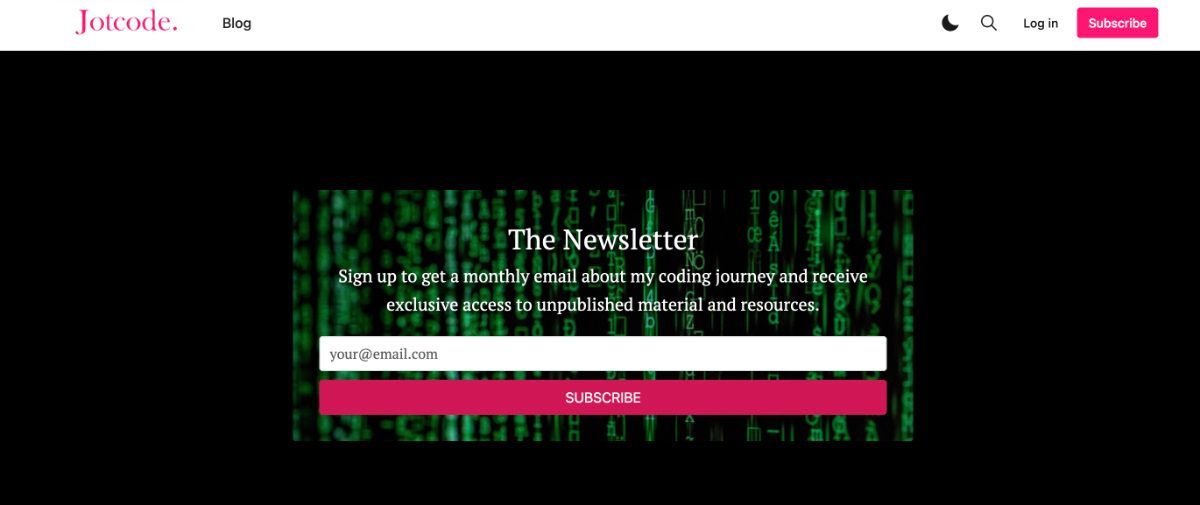
.subscribeBlock1ImageOverride{
background-image:url('image-url.png') !important;
}
/* Subscribe Block 1 End */
The following code:
.subscribeBlock1ImageOverride{
    background-image:url('image-url.png') !important;
}Is so that you can add the .subscribeBlock1ImageOverride class to any specific implementation of your snippets so that you can have a custom background image instead of the default one.
So we will put this code into our Ghost settings area.. if want to directly implement it into your theme you can also just ++ but I would recommend just putting it into the Ghost settings area and ensure you back it up somewhere in case it ever gets deleted.
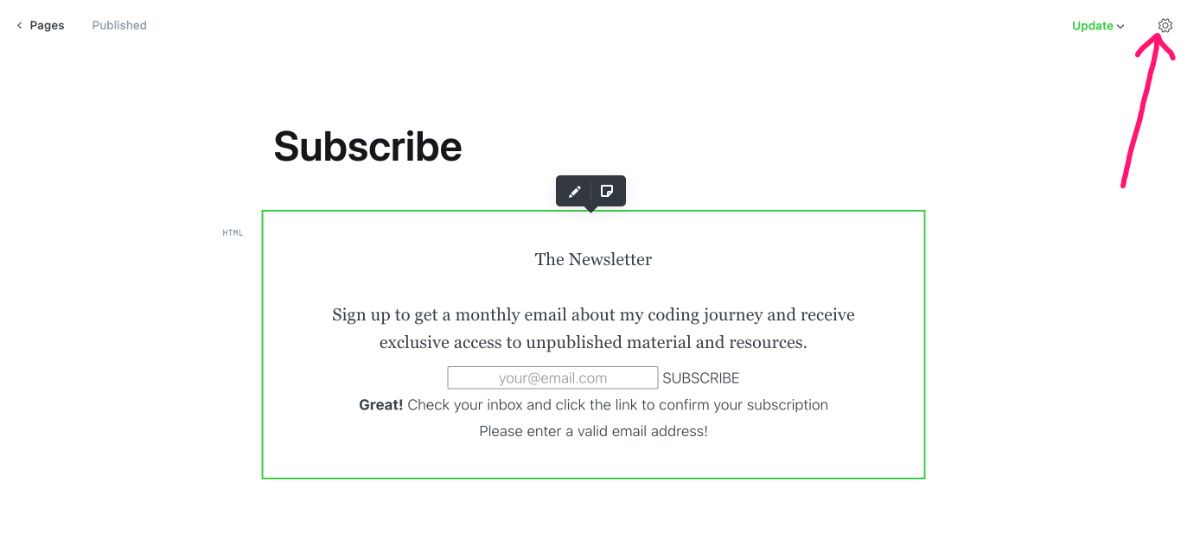
Custom Subscribe Page
Now that we had a subscribe form on our blogs, we can easily update the settings and the change will be reflected on all the blog posts.
Since we have this code ready we can also use it for a subscribe page. So on your Ghost blog create a new page called 'subscribe'
In here we can m
Remove the subscribeBlock1 class so that the snippet will show without the background image.
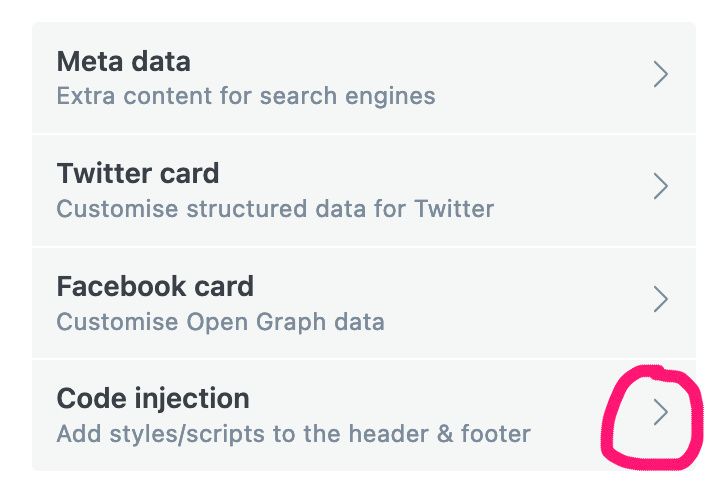
Now you can open the page settings on the top right corner:
In here you should see the option for code injection on the bottom:
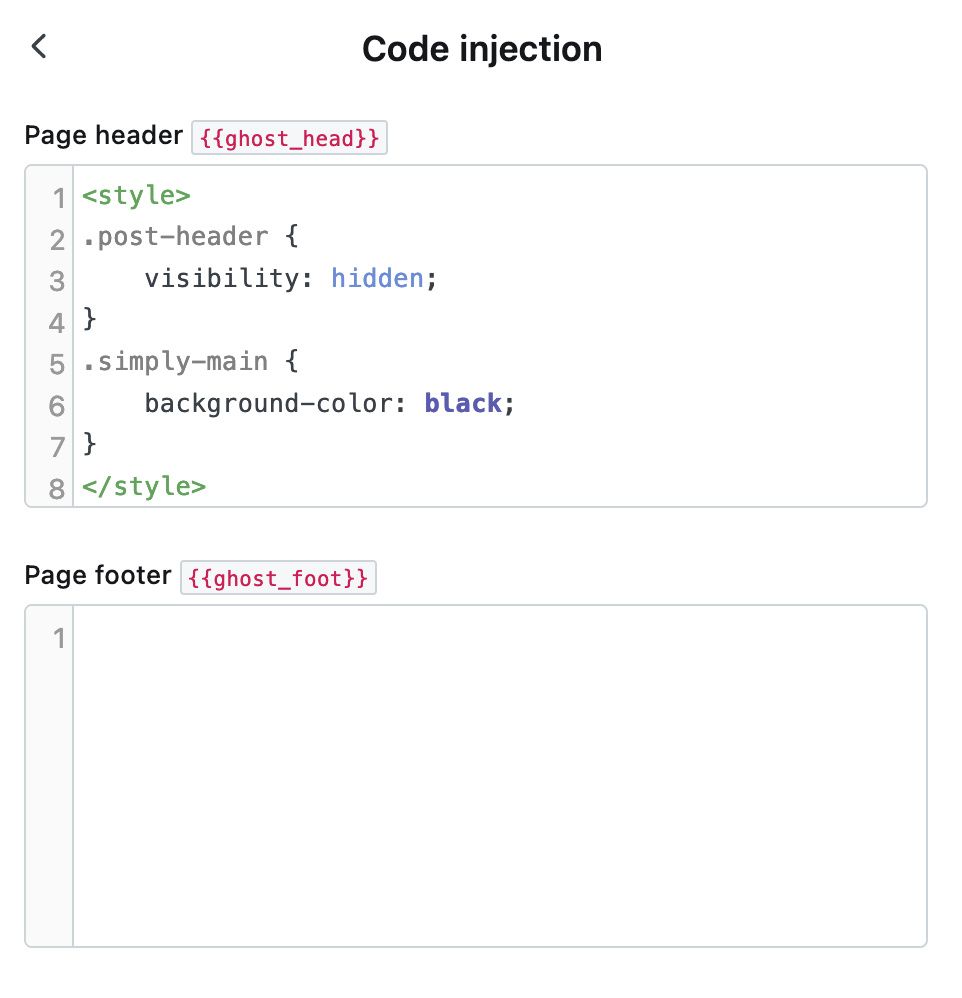
Now we can add the following code into the page header to hide the page title and make the background black.
So previously it should have looked like this:
And now it should look a little better: